Consequently, studying MFC deserve it..
From now on, I will study both MFC and Window API programming with OpenCV2.3.
Anyway this post is about opening image/avi/webcam on MFC dialog window.
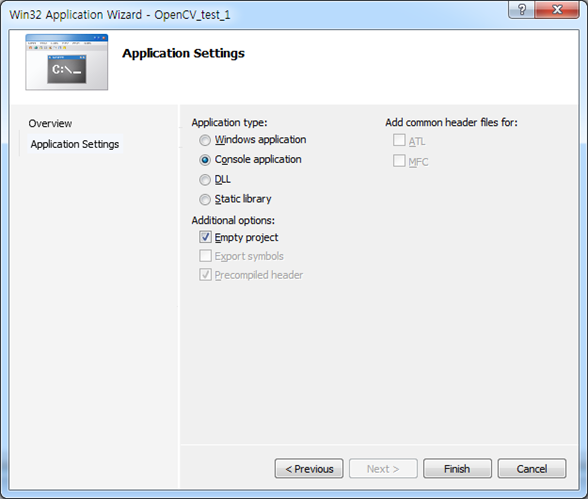
Before start, run the Visual studio2008 and make new project. Select MFC Application and dialog based like images shown below.


What a weird configuration!
Don't be confused.
First, let's set up OpenCV library on it.

And include cv.h and highgui.h in C****Dlg.h

Second, go to resource view and make picture controls and buttons like below.

Add each picture control to variable and name its ID.


Now, a function is needed for convert image to bitmap because MFC support only bmp files. Until OpenCV 2.2, a class named CvvImage is provided and that class provides useful function for using image file in MFC, but from ver2.3, CvvImage class is not provided. So, Some functions that can change any image to bitmap file is needed.
It is a little bit hard opening image on MFC without CvvImage, but fortunately I found a function in OpenCV Korea cafe.
The function is as follows:
-------------------------------------------------------------------------------------
void DisplayIplImg(IplImage* pImgIpl, CDC* pDC, CRect rect)
{
BITMAPINFO bitmapInfo;
bitmapInfo.bmiHeader.biSize=sizeof(BITMAPINFOHEADER);
bitmapInfo.bmiHeader.biPlanes=1;
bitmapInfo.bmiHeader.biCompression=BI_RGB;
bitmapInfo.bmiHeader.biXPelsPerMeter=100;
bitmapInfo.bmiHeader.biYPelsPerMeter=100;
bitmapInfo.bmiHeader.biClrUsed=0;
bitmapInfo.bmiHeader.biClrImportant=0;
bitmapInfo.bmiHeader.biSizeImage=0;
bitmapInfo.bmiHeader.biWidth=pImgIpl->width;
bitmapInfo.bmiHeader.biHeight=-pImgIpl->height;
IplImage* tempImage;
if(pImgIpl->nChannels == 3)
{
tempImage = (IplImage*)cvClone(pImgIpl);
bitmapInfo.bmiHeader.biBitCount=tempImage->depth * tempImage->nChannels;
{
tempImage = (IplImage*)cvClone(pImgIpl);
bitmapInfo.bmiHeader.biBitCount=tempImage->depth * tempImage->nChannels;
}
else if(pImgIpl->nChannels == 1)
{
tempImage = cvCreateImage(cvGetSize(pImgIpl), IPL_DEPTH_8U, 3);
cvCvtColor(pImgIpl, tempImage, CV_GRAY2BGR);
bitmapInfo.bmiHeader.biBitCount=tempImage->depth * tempImage->nChannels;
}
else if(pImgIpl->nChannels == 1)
{
tempImage = cvCreateImage(cvGetSize(pImgIpl), IPL_DEPTH_8U, 3);
cvCvtColor(pImgIpl, tempImage, CV_GRAY2BGR);
bitmapInfo.bmiHeader.biBitCount=tempImage->depth * tempImage->nChannels;
}
pDC->SetStretchBltMode(COLORONCOLOR);
::StretchDIBits(pDC->GetSafeHdc(), rect.left, rect.top, rect.right, rect.bottom,
0, 0, tempImage->width, tempImage->height, tempImage->imageData, &bitmapInfo,
DIB_RGB_COLORS, SRCCOPY);
::StretchDIBits(pDC->GetSafeHdc(), rect.left, rect.top, rect.right, rect.bottom,
0, 0, tempImage->width, tempImage->height, tempImage->imageData, &bitmapInfo,
DIB_RGB_COLORS, SRCCOPY);
cvReleaseImage(&tempImage);
}
}
Among 3 variables used in the function, pImgIpl means point variable of image loaded by OpenCV, pDC means structure information where to open image, and rect means size of where to open image. pDC and rect should be declared by CDC class and CRect class variables before using.
IplImage* image;
CDC* pDC1;
CRect rect1;
These variables are for load image on picture control. And then go to OnInitDialog function that is pre-process as soon as run this project.
Type like below.
--------------------------------------------------------
image = cvLoadImage( "test.jpg"
);
pDC1 =
m_pic.GetDC();
m_pic.GetClientRect(&rect1);
---------------------------------------------------------


Now, add function to display image.
Name of Function is DisplayIplImg, and input each parameter on it
-----------------------------------------------------------------------
void DisplayIplImg(IplImage* pImgIpl, CDC* pDC, CRect rect)
--------------------------------------------------------------

And then go to where the function is declared, copy and paste codes of function

Third, move on to dialog window and double click Load Image button. In there you can make some event.Input below codes in the event function.
-------------------------------------------------------------------
DisplayIplImg(image, pDC1,rect1);
--------------------------------------------------------------------

Move on to dialog window againg and double click close button. In there, input below codes.
-----------------------------------------------------------------------
cvReleaseImage(&image);
-----------------------------------------------------------------------

Now, Let's code for the video clip and webcam to open on dialog window. Both of two are similar. outline is as follows:
1) Declare variables
2) Get the information of picture control
start capture from video and save buffer for moment
3) Set the timer and call and display buffer image when timer on
1. Declare variables
use Add->Variables on c***Dlg class and input below
------------------------------------
IplImage* m_FrameVideo;
IplImage* m_FrameWebcam;
CvCapture* captureAVI;
CvCapture* captureCAM;
CDC* pDC2;
CDC* pDC3;
CRect rect2;
CRect rect3;
-------------------------------------
2. Go to initializing function of the class. You can see it easily as double clicking on C***Dlg class. It is same place where you input codes for opening image.
---------------------------------------------------------------------
captureAVI =
cvCreateFileCapture( "test.avi" );
captureCAM =
cvCaptureFromCAM(0);
pDC2 =
m_video.GetDC();
m_video.GetClientRect(&rect2);
pDC3 =
m_cam.GetDC();
m_cam.GetClientRect(&rect3);
----------------------------------------------------------------------------
3. In dialog window, just double clink on Open VideoClip button. Then input below codes.
Repeat again on WebCAM button.
-------------------------------------------------------------
//(In Open VideoClip button)
SetTimer(1,30,NULL);
---------------------------------------------------------------
//(In Open WebCAM button)
SetTimer(2,30,NULL);
-----------------------------------------------------------
In SetTimer Function, first parameter means channel of timer, second parameter means how frequent call Ontimer function.
Go to Message Handler and make OnTimer()

------------------------------------------------------------------------
//in OnTimer()
if(nIDEvent == 1)
{
m_FrameVideo
= cvQueryFrame( captureAVI );
if(!m_FrameVideo) KillTimer(1);
else DisplayIplImg(m_FrameVideo, pDC2, rect2);
}
if(nIDEvent ==2)
{
m_FrameWebcam
= cvQueryFrame( captureCAM );
DisplayIplImg(m_FrameWebcam,
pDC3, rect3);
}
----------------------------------------------------------------
Finally, go to close button function and release memory.
--------------------------------------------------------
cvReleaseCapture(&captureAVI);
cvReleaseCapture(&captureCAM);
------------------------------------------------------------
 |
| Result |


